Saturday, April 28, 2012

Little details

I'm one of those semi-detail oriented people.... I say semi because it really depends on what it is that I care about. So, when it comes to measuring before I hang a shelf.... yeah, I just eyeball it and call it good. Do I have a million holes in my walls, yeah I do! Now, when it comes to little cute details like ric rac on pillows, pleats on baby dresses, buttons on baby shoes, ribbon on wall hangings, birds on lamp shades, yoyo's on pillows.... well you get the idea, I am super detailed! I LOVE little details that make something special. So with that in mind, here's a quick little project that has a cute little detail.


I started with a 2 dollar shelf from Goodwill- it was raw wood. I primed it white- see it there laying long and diagonal?- yeah, that's the one.

Then I painted it this froggy green color and sprayed it with a clear coat.

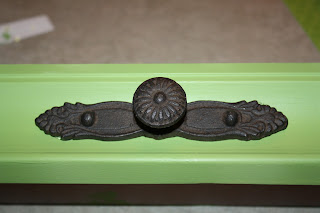
I had picked up these little drawer pulls at the craft store because I like shabby chic, vintage looking stuff- and these look old to me. So, I whipped out my trusty hot glue gun, took the screws out of the drawer pull and went to work! (suddenly I'm hearing Bob the Builder say "can we do it?" and I want to shout "YES WE CAN!!!"... clearly I have a toddler!)

Another shot of my supplies- :) Now all you have to do is put gobs and gobs of hot glue on the back of the drawer knob and stick it where ever you think looks good on the shelf...

Smack dab in the middle is where I wanted it- so there it is!

I hung it on the wall, threw a couple little things on it and - there you have it- a little shelf with a sweet little detail!
 
This is a little up close- see that adorable little frog on the block? He looked a little plain, so I decided to add a little detail to him too.

Grabbed some scrapbook paper, scissors and double sided tape- whipped out an initial and stuck 'er on! It's like kindergarten art time all over again- LOVE it!!!
So there you go- little details that can add charm, fun or fancy to plain objects.

Friday, April 27, 2012

Fabulously Fun Fabric For .... Pillows!

Yeah, so pillows doesn't start with an "F" so it kinda messed up my title.... oh well.... bygones!
So, here is a sampling of some of the fun slipcovers I've been making for my living room.

These are fun little birds I made using heat bond, fabric and some zigzag stitching on the sewing machine. The long striped pillow is from a jelly roll I bought and put together- I used the entire jelly roll until I had one large piece of fabric and then I just cut that to size for each project.


This is the pillow I made using the home made fabric yoyo's.... it's probably my least favorite because I regret my choice of fabric for that center yoyo.... oh well....


I pretty much LOVE this one! It's a felt fabric flower that I sewed instead of glued- and I adore it! The actual cover is made from a piece of shower fabric that we got on clearance at Target- the shower curtain was over two yards big and it was only 4 bucks!- pretty sure there will be more yellow in my future!


This funky little pillow was an attempt at using up some scraps- so I sewed the three prints together, added a flap of green that I appliqued the same little birds too and wala! A patchy, funky pillow.


These are some of the pillows on the couch- the second one from the left is another section of the same jelly roll, and some canvas and little fabric yoyo's.

So, as you can see, there are endless possibilities when it comes to making slip covers for pillows!

Simple slip covers for pillows

Did I mention I've been redecorating my living room? Well, I am! I had a ton of pillows from the last color scheme, so instead of buying new pillows I just made slip covers for them! Talk about cheap- I got some of the fabric for 75 cents a yard! So, I thought some of you might want to freshen up your room with a few simple slip covers.

Just so you know, you DON'T have to sew these if you have a hot glue gun! Seriously, it works to just glue the fabric together!
Supplies- pillow
    fabric
sewing machine or hot glue gun or iron on fabric bonding strips
(for those of you using a hot glue gun- just be sure that each seam is completely cooled and secured before you move on to the next one. )


Step one- measure the fabric- you want to allow about 1 1/2 inches around the pillow for "fluff" room. Be sure to position your fabric with the design the way you like it before you cut for the front of the pillow.  Then cut two pieces of fabric for the back- you want to cut one piece about 3/4 the size of the front panel and the second piece for the back should be about 1/2 the size of the front panel. This will allow for plenty of overlap for the back section of the pillow.

Position the two pack panels next to the front panel to get an idea of overlap and the look you will have. If you are happy with it- let's move on!

Iron down the seams of the two back panels that will be overlapping for the "pocket" of the panel. First press the raw edge down about 1/4 of an inch.

Now, turn that edge over again to form a finished edge. This should also be about 1/4 inches. (if you are hot gluing or using bonding strips, you would still iron your edge first then go back and run a bead of hot glue the entire length- or place a strip of fabric bond in the seam and iron over that to melt and adhere to the fabric).

If you are sewing- turn your fabric so it is right side up and stitch a straight seam down the length of the fabric.

Once you have done both sections of the back of the cover, you are ready to fit the pieces together. Begin by laying the larger panel on top of the front cover section WITH RIGHT SIDES together- this is important- otherwise your pillow will have the back of the fabric in some spots!

Next place the smaller section on top, matching the sides and top with the fabric that will be the front of the pillow- again with RIGHT SIDES facing each other. - You should now have a layered look going with the finished seams in the middle of the back of the pillow. You can pin the sections in place to ensure you sew all the layers together. (if you are using hot glue- simply glue the larger panel to the front piece first, then the smaller one to the top of the front and the back of the larger panel so all pieces are glued together- same for heat bonding strips).

This picture just shows that I have all right sides together with the finished seams over lapping .


It should look like this from the back of the cover.


If you are sewing, just stitch a straight stitch around the entire cover, about 1/2 inch from the raw edge- making sure to keep all layers together. Once you have sewn around the cover once, it's a good idea to turn it right side out and make sure you didn't miss any fabric in the seams.


Go ahead and stitch a second straight stitch all around the edge of the cover (this is of course with the fabric turned wrong side out)- this will just give the pillow cover a little extra strength.


When you are finished you should have about a 1/4 or 1/2 inch raw edge all the way around the pillow cover.


Turn the cover right side out and stuff your pillow in there. This is how the back should look. Enough overlap that you don't see the pillow at all.


This is how the front should look- design placed nicely to the front .

Now, throw that baby in a chair or on the couch and go make about 15 more!!! Oh, is that just me?... YEAH, I DID THAT!!! I will post some pictures of all the fun pillows I made a little later.
(oh, see this cute vintage chair- it's going to be a project- I'm going to try to recover it!)

Thursday, April 26, 2012

Fabric yoyo's!

I was in the craft store and I found these adorable little fabric yoyo's, they were a little spendy but I bought a pack anyway because I didn't know how to make them. Well, I got those little cuties home and started analyzing them, and in about two seconds flat my genius kicked in and I realized a kindergarten could make these! So..... I tried it, and it totally worked! Can you tell I was a little surprised? Yeah, well it always amazes me when something so simple sells for soooo much- see, ignorance is not bliss- it's stinking expensive! But, no more   I , you, WE will never have to pay for these prepackaged yoyo's again!

Start out with a circle of fabric- your yoyo will shrink by  about 1/3 the size of this when finished, so measure accordingly.

Flip that baby over and get ready to see miracles happen.

Start by folding 1/4 into the center.


Now begin pleating, simply fold the fabric over itself to form a pleat and hold in place. (I used the sewing machine for mine, but you can use a hot glue gun if you want, just put a little dot of glue under each pleat).


Continue pleating around the circle and holding in place with your finger- don't let those pleats out!


Once you reach the half-way point you are ready to stitch that half in place.


Just run a straight stitch across the center most points of the pleats to secure them.


Now, continue where you left off and pleat the other half. The very last pleat can be a little tricky, so just work with the fabric until you are happy with the last little pleat.


Stitch the other half of the pleats and your yoyo is complete! Yes, the center is kinda ugly (which might be perfected later as I continue to make these- and if so, I will update you!)


These are the little baby yoyo's I bought at the store- and I didn't want them to go to waste- so I used them to cover the center of my bigger yoyo's.


My machine has a "fix" button, it just stitches a spot in the same place a couple of time to hold something down. So, that's what I used to keep the little yoyo's attached. If your machine doesn't have this feature, you can hot glue the yoyo on top, or you can use a straight stitch and just go back and forth in a tiny spot a couple of times.


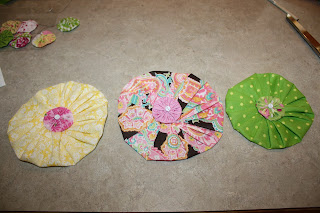
These are my big daddy yoyo's with their little baby yoyo's in the center. I also decided to cover the center of the little ones with a tiny white button- just for extra cuteness and to cover the opening- even the store bought ones have an ugly center.


This is what I did with them- made a pillow cover. The possibilities are endless- I could see these as an adorable hair clip, on  a lamp shade, added to cute towels, on the corner of a pot holder, tiny ones sewn to little girly socks..... ok, you get the idea!
If you do make some of these- post a link to your blog and let me see what you did with them!

Wednesday, April 25, 2012

Little knobs.... lots of charm!

So, we've been making projects around here, and this is one I just love! I got this brainiac idea and put it together, and I love it! Did I already say I love it???.... well I do!


 Oh- just so you know- in case it isn't completely obvious- I am NO professional! I try to make my posts clear and step by step... but I'm not a professional- so please read the entire post- BEFORE- you do the project. If you have any questions or comments- please feel free to leave them and I will try to help as much as I can...... you know, not being a professional and all.


Supplies you will need- large flat board (length/width and thickness is totally up to you).
                Small wood plaques in different shapes/sizes.
                Drawer pulls in your choice of color/size.
                Spray paint/primer and spray paint colors of your choice. (optional- clear coat)
                Wood glue
                Hot glue gun/glue sticks
                Drill
                Hacksaw (or other tool designed to cut metal)

Start out by primer/painting your wood board and plaques.
 This is the king of spray paint/primer combos- I LOVE this stuff1 It covers great and if you want to paint over it with another color it really helps!

These were my color choices- unfortunately I couldn't find the green in a spray- so I had to brush it on.

Paint your board and plaques in your color choices- may take two coats- finish with clear coat if you want.


Next- drill holes through plaques where you want to put your knobs- this is totally up to you depending on the look you are going for.

Then measure on your large board coordinating spots to either put the knob screw through, or if you don't want to actually use the knobs for hanging, you can counter sink a small hole so the plaque with the knob will lay flat on the board.  If you are going to do this last option, go ahead and cut the screws off even with the bolt.

This picture shows the hole cut in the larger board, filled with wood glue to let the bolt from the knob rest in it- it will also give a tiny bit of support.

This is the back of one plaque with the screw cut off even with the bolt and wood glue applied.

Because I do not have the patience of Job... who am I kidding , I have NO patience! I chose to hot glue the plaques as well as wood glue them. So just run some hot glue around the edges of the back of the plaque- but not too close because you don't want it to squish out on the back board.


Now, press the plaques into the back board being careful to line up the screw from the knob into your pre-drilled holes. (note- if you want to actually use this as a coat rack/towel rack- drill completely through the back board so the entire length of the screw will go through the board and you will attach the bolt to the back of the large board- then cut the screw off so it is flush with the bolt).

When you have everything in place, it should look something like this!
  

Seriously, could this be any cuter???? No, I didn't think so either!