Thursday, April 18, 2013

Monkey bread!

Monkey bread was a special treat that I LOVED as a kid! We would all wait for it to be finished cooking so we could devour it! Not much has changed since then! Well, except the fact that I am the mama making it, so I get to sneak a bite here and there to "make sure it is cool enough to eat"... wouldn't want my little darlings to burn their tongues!
 
Sorry for the shadowy picture- they were hoovering like vultures while I was trying to snap a quick shot!


Mmmm.... gooey deliciousness that just makes you want to go make some now... oh- that's me! I want some RIGHT now!!!

So, what do you need to make your very own? Here ya go!-

4 cans plain cheap biscuits
1 stick of butter
1 1/2 cups brown sugar
1/2 cup chopped pecans (optional- and you can use any kind of nuts you like)

So, on medium heat melt butter in a sauce pan- once melted stir in brown sugar.
Let the brown sugar completely melt, and turn up the heat to medium high for just a minute or so- until the brown sugar and butter begin to boil. Stir constantly for about 1 minute while it boils then remove from heat and set aside. (if you are using nuts, add them to the brown sugar and butter now)

Open biscuits and cut each biscuit into fourths.

Grease a bunt pan and pour about 1/3 of the brown sugar/butter/nut mixture into the bunt pan.

Layer about 1/3 of the biscuits on top of the sugar sauce. Pour another 1/3 of the sugar onto those biscuits and continue layering until all of the biscuits and sugar sauce is used.

Pop into a pre-heated oven at 400 degrees for 15-20 minutes. Since ovens vary, just keep a check on the biscuits- once the top layer is golden brown go ahead and stick a cake tester in to see if the middle is done.

Remove from oven and let sit for about 5 minutes (this is the really hard part- waiting!)

Once cooled a bit, turn it out of the bunt pan onto a serving platter.

*Use a plate with a good lip- the brown sugar and butter mixture will pour out a bit once you turn the bunt pan over.

Let cool just another few minutes and then dig in!

(little side note... if bunt pan is actually spelled bundt- I apologize- my spell check says it's bunt- but my head says it's bundt.... so there! ha!)

Blue and Purple Birthday Bash.

I usually go overboard with themes for parties. I LOVE themes! So, when this party rolled around and the guest of honor didn't want a theme- I was like "WHAT???? How am I going to throw a party without a theme?" ... anyway- at least there was a requested color pallete, so I went with that.
 

                          Sweet little tissue paper flowers and curling ribbon  for the mantel.

Tissue paper pom poms for the front room. Just a note- I bought the large ones at Hobby Lobby- they were a three pack with three sizes and honestly- they were awful! I hated them! They were lopsided and just funky! I actually bought tissue paper in the right colors also, so I made my own pom poms and flowers and they were much better than the pre-packaged! So, for the money- just make them yourself- I think you will be happier. I know I was!


This was the goodie basket table- I found a bunch of cool stuff at really good prices and let the kids pick whatever they wanted to take home. I bought table cloths in purple (just and fyi- Walmart has them for 98 cents!) and then at the dollar spot at Target I scored this metallic wrapping paper that happened to coordinate perfectly! So, I used the wrapping paper as a table runner to add some sparkle.


I made these little flowers, and the little streamer is actually a pack of table scatter circles that I just strung together with needle and thread.

This was the look when you walked in the door.


Please excuse the Mr. eating chips and salsa! So, I used the balloons on a string concept to hand balloons over the bar- it worked out really well and was super easy. However... yeah, my purple balloons look a little pink... sad... Oh, you can see I used the same paper and table cloth in here too.


This was actually my favorite thing and I didn't even get a good picture! I made a huge flower for one end of the curtain rod and then hung streamers in the coordinating colors as a curtain. I also wrapped the rest of the rod in the streamer so it coordinated. For the food eating table I actually used the table scatter as is was intended... ha! I don't usually use anything the way I am supposed to!
                     So there you have it- my un-themed party that was perfectly coordinated!

Bowie Banjo

This is Mr. Bowie Banjo!
 
 
                                                         This is how he feels about our photo shoot!


Isn't he just the cutest little bug! He is light beige and white with baby blue eyes!!! Such a cute combo.
  
Little kitty in a bicycle basket, melt my heart! My husband said "this is just play time for you, huh?"... well- Yes! I guess it is. ;)
Hope these pictures brightened your day!

Friday, November 16, 2012

Owls!!!!

 
Have you noticed owls everywhere you look? My sister has been an owl fan for a while- but I finally got on board a few months ago. Since then I have seen them more and more- everywhere I turn I see cute little hoot owls begging me to bring them home! I have a few and thought I would give you some non-traditional ideas for decorating with these adorable little creatures.
 
 
I bought a neutral colored owl planter- intended for a house plant- but I put it in our family room to collect all the remotes for our t.v/ dvd/ wii- they are all in one place and the owl is just big enough to hide them. I LOVE it!
 
See the cute green "see no evil, hear no evil, speak no evil" owls on the top shelf- I bought those and arranged them on a bright shelf in the front living room under a picture- they are so cute!
 
I bought a white owl vase to display flowers in too.
 
Other uses for these cuties would be-
book ends
paper weight on your desk
Dining table center piece
Utensil holder in the kitchen
Candy dish
Tooth brush holder in the bathroom
 
You get the idea- so even if it's "supposed" to be a vase/planter- you can re- purpose it for whatever you want.
Add a little fun to a room- go get an OWL!
 

Sunday, October 21, 2012

Creamy Chicken Alfredo Casserole

 
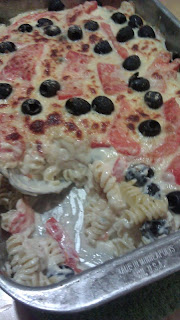
It's that time again- casseroles, crock pot meals and comfort food! This was my attempt at an Alfredo based pasta casserole- and it turned out pretty yummy!
Start by cooking your pasta according to packaged directions. This recipe was intended to serve 6-8- so I cooked about 4 cups of pasta. While the pasta is cooking make your Alfredo sauce.
Heavy whipping cream- about 3 cups
Butter (1/4 stick)
1 cup grated Parmesan/Asiago/Romano- you can combine all three or use only one kind- but total should be 1 cup of grated cheese.
1 Tbsp garlic powder
1 Tbsp onion powder
2 tsp dried parsley/basil or combo of Italian herbs

Melt butter, herbs, garlic powder and onion powder in a sauce pan.  Once butter is completely melted, stir in whipping cream. Heat on medium/high until cream is at a low boil- turn down to low add grated cheese and simmer/stir until completely incorporated and the sauce is thick. (add more cheese if you like)- salt/pepper to taste.

Casserole ingredients-
Cooked pasta (I used rotini)
Two large chicken breast- seasoned, baked and cubed.
Two medium tomatoes- sliced
1 can medium black olives
1 cup grated mozzarella cheese

Spray large casserole dish with non-stick spray. Pour half of the pasta in, sprinkle with grated Parmesan and top with shredded mozzarella cheese. Cover with half of the Alfredo sauce and top with fresh tomato and olives and half of the baked chicken. Pour remaining pasta on top and repeat toppings- add more mozzarella to the very top layer. Bake at 350 for 20-30 minutes until cheese is bubbly and casserole is heated through.

As always- tweak it to your liking- add different veggies- I LOVE artichokes and thought they might be a good addition. :) If you do make it- let me know how it turns out.

Tuesday, October 16, 2012

Blackberry Cobbler Baby!

One of my most favorite childhood memories is blackberry picking with my family. We lived in Oklahoma, so it was hot and there were so many mosquito's! It didn't even matter, I was thrilled to grab a big plastic jug and head out into the pasture with my siblings! We would get all scratched up and our legs would be stinging, but we LOVED it!... what in the world was wrong with us???? Anyway, when it was all said and done, my mom would make blackberry cobbler, and it was the best!  Thankfully blackberries are abundant where we live now too. So, we take the kids out to pick blackberries all summer! Last year I got the bright idea to train a blackberry vine over the fence and down a trellis into our backyard, that way the berries would be low to the ground so the kids could pick them without much help. It was great! Of course the biggest, juiciest ones are just out of reach, so there I was strategically balanced on one foot leaning half way off a ladder on tippy toe saying to my 4 year old "baby, hold the ladder so mommy doesn't fall"...... what in the world is STILL wrong with me!!!! Oh the things I do for blackberry cobbler!

So, I'm going to share my not exact- no where near precise "recipe" with you! This recipe will be for roughly 4 cups of berries.
Step 1- acquire blackberries- sure you can buy them store bought- but the thrill of nearly loosing a limb to secure the "perfect" berry would have escaped you!
This my friends is the PERFECT blackberry! See how huge and plump and dark it is! Leave the red ones, leave the puny ones- go for the gold...er... black!
Wash the berries- store bought ones too- just rinse in cool water and get any leaves, twigs, etc. out. Bugs, well, a little extra protein never hurt anyone... except the bug of course!

Step 2- spray your baking dish with non-stick spray, or use good old fashioned butter to grease the bottom of the dish.
In a medium mixing bowl combine 1 1/2 cups sugar 2/3 cup corn starch- mix well and add blackberries. Stir to coat and pour mixture into baking dish.

 Now for the cobbler breading. Mix 2 cups flour, 1/2 cup sugar and 1/2 to 2/3 cups milk- you need to add enough milk for the batter to be pretty runny- about the consistency of pancake batter.  Pour batter over the berries in the baking dish.

 Slice one stick of butter into thin slices and distribute evenly over the top of the cobbler batter. Sprinkle top of batter with sugar to cover entire top.

Bake at 375 degrees until the crust is golden brown and the berries are bubbling.

                                                        It should look something like this.


Now, top with some creamy vanilla ice cream or whipped topping- heck, just eat it straight out of the dish- no matter how you serve it, it makes the blackberry picking process SO worth it!!!

Asian pear pop-overs

I made these the other day on a whim, but they turned out so good I thought I would share the "recipe".  I use that term very loosely considering that I am a throw it and and cross your fingers kind of cook! But I will give you the gist of what I did and you can tweak it to your liking.
 
Pop-overs
1 can crescent rolls
4-6 small Asian pears- pealed and cubed (substitute any fresh fruit you like)- or use pie filling for the store for a faster/easier filling.
1/2 stick butter
1cup sugar (divide out 1/4 cup for the cinnamon/sugar sprinkle on top)
3 tsp cinnamon
2-3 Tbsp corn starch
1/2 cup water

Whipped topping
2 cups heavy whipping cream
1/4 cup sugar (adjust sugar to your preference)
2 tsp vanilla

To make pop-overs begin with 1/2 cup water in a small pan, add fruit and bring to a boil, reduce to simmer. Add in 3/4 cup sugar and 2 tsp sugar. Stir until sugar is completely dissolved and liquid- continue to simmer until fruit is tender. Add in cornstarch 1 Tbsp. at a time until the fruit mixture reaches desired thickness for filling- *you made need to turn the heat up to bring back to a boil and then reduce again to simmer. Remove from heat and set aside.

Open crescent rolls and lay on baking sheet. *you might want to roll them into a more square or wider triangle than how they are shaped straight from the can. Spoon fruit filling into center of each roll and pull corners together to the center overlapping them.

Melt butter in microwave to an almost liquid state (about 20 seconds). Combine 1/4 cup sugar with 1 tsp cinnamon in separate bowl. Brush the tops of each pop-over with butter and sprinkle cinnamon/sugar mixture on top of pop-over.

Bake according to crescent package directions.

While pop-overs bake prepare fresh whipped cream.

Combine 2 cups heavy whipping cream, 1/4 cup sugar and 2 tsp. vanilla in large mixing bowl. Mix on high until the cream becomes fluffy and whipped. Set aside in refrigerator until pop-overs are ready to be served. Serve pop-overs warm with whipped cream on top.

These were a hit with my family! I actually made two batches and we only had one left!